


TAP Article: DIY Bathroom Organization
Sometimes limited space creates limited storage. Small spaces get super cluttered, very easily. All it takes is not having a place to put something or having inconvenient places to store things that don’t make our lives easier or save us any time. Families with children or people constantly on the go can struggle with keeping everything at home organized, especially the bathroom. Hairdryer cords, random q tip spillage, towels on racks too small or having to be hung on shower rods, makeup and skin care settling on the sink, and toothbrushes haphazardly everywhere. TAP Plastics is here to give you some amazing DIY ideas and solutions to tame your bathroom mess and make it a snap to get ready each morning.
 Sinks and Countertops
Above the Sink
If space is an issue, you can immediately add more by considering storing items on a shelf or riser over the sink. A clear acrylic riser will match any bathroom décor you already have or may choose to have in the future, is easy to clean, can be painted, drilled into and cut if needed. But the most important part is that it grants you space on countertops if you need it and a place to pick up items you may store or place on sinks the most. You could place your hand soap, toothbrush holder, favorite daily cleanser, favorite makeup, water pick, perfume and whatever other small items you find cluttered around the sink. Stackable boxes can give you the same benefit as well.
Other easy and do-able above sink ideas to keep counters clean:
- Install a ledge-style shelf over the sink and under the mirror. It doesn’t take up much space but would be a wonderful extra surface for laying out cosmetics and toiletries there instead of the counter or sink.
- Even the tiniest bathroom can have shelves! Think shallow! Bottles and jars only need a few inches of space.
- For small bathroom spaces, open it up a tiny bit by making it reflective. Using acrylic mirror sheets or two-way mirrored acrylic sheets as an accent to your shelves help create the sense of a larger space.
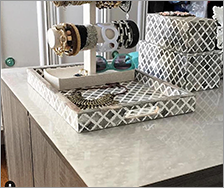
Cake stands aren’t just for cake anymore. To create an appealing multi-level organizer for a shelf, a countertop or inside a cabinet, an acrylic cake stand might be just want you need. Easy to assemble, easy to pull apart when changing your mind about where to put it as well as being clear, it will match wherever you decide to place it. These acrylic cake stands are excellent for jewelry, soaps, small bottles or containers, sanitizers, perfumes and more. Plus, it saves you space by giving you storage upwards, not outwards. Don’t forget that stackable boxes can help as well!
Hair Tools in One Place
Clear or colorful, showcasing or fun? Storing your cooled hair irons or hair dryers, hairspray and hair products can be all these things. Our colored plastic boxes can add bright, cheerful color for kids and adults, or the canister series with bold colors along the bottom and the classy and chic showcase boxes. Large enough for the tool and the unwieldly cord as well, these should help you from spending precious time in the morning unraveling cords from five or six hair tools trying to get to one! And, because these boxes are generally see-through, one look would be all it took to find the hairspray, gel, or treatment you need.
 Magnetic Makeup Board
 Get your favorite cosmetics off the shelves, counters, or your old hard to organize drawers with a magnetic makeup board. A sheet of acrylic, some magnetic sheeting, magnets, and whatever creative idea to add your own flair is all you need. Makeup items such as compacts, mascara, blushes, eyeshadow palettes, small creams or cream eyeshadow containers can be hung up for an easy to find display.
Customize the acrylic sheet with literally any paint or use a tough glue, like TAP Acrylic cement to place your favorite fabric or cut out pattern. Either use more magnetic sheeting on the back or use individual magnets to secure your makeup and hang it! Voila, art and organized at the same time!
Personalized Bathroom Shelves
TAP Plastics makes creating your own custom bathroom shelves and personalized bathroom shelves super easy. First, figure out what size you need and how deep you want these shelves. 4-6-inch deep acrylic makes the perfect little box-shaped shelf that you can assemble and decorate at home. Next, decide if you want to paint or stylish them! Acrylic can be drilled, sawed, painted too—so if you want a spot of color or help your little ones distinguish between their bathroom supplies and their sibling’s, you can paint the inside or outside, or glue fabrics and paper anywhere. 4-6-inch deep shelves built like an open box gives your bathroom a modern, chic look, while helping you store your items off limited or valuable counter space. Plus, if you have a full household, keeping toothbrushes, favorite toothpastes, perfumes and more as easy as pie in these.
Hanging Rope Shelves, Space Saving Style
- Acrylic planks or sheet, 6” x ½” with predrilled holes, or holes drilled yourself!
- Favorite contact paper
- Rope
- Metal ruler
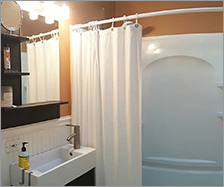
Towels, Washcloths, Toilet Paper Too
Ultra-classic and ultra-modern can be as affordable as a clear acrylic towel rod and some creativity.
- Clear 1” acrylic rod cut to desired length
- 2 ceiling brackets for a 1” rod
- Gold spray paint/Spray paint that matches your bathroom decor
- Drill or screwdriver (Or ask TAP Plastics for customization help!)
- Superglue
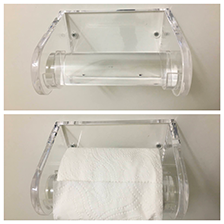 If your brackets are the perfect shade already, you don’t need to paint them. However, if they aren’t available in gold or the finish is wrong, go ahead and spray paint them to match your bathroom. Once your brackets are dry, you can mount them where you want the bar to hang. For example, if your acrylic 1” rod is 26” long, you’d want to mount the brackets about 24” apart. Now slip your acrylic rod into place and that’s it! You can choose to tighten the screws that come with the brackets or a bit of super glue to keep the rod in place. Additionally, you can use the above with a much smaller rod and a single bracket to make a luxury matching toilet paper roll holder!
  Drawers and Cabinets
One of the near-effortless ways to organize bathroom drawers is by use of plastic containers. These containers can sort everything from medicines, favorite earrings, makeup, skincare or more. Make sure the plastic containers, or boxes you will be using are a little less in-depth than your drawer (so you can shut it!) and go mix and match to your heart’s content! Long-lasting and durable, one of the most popular choices is our clear flat top boxes that come in 8 different sizes. With the flat top included, it’s even more perfect as you could fill them all the way to the top and cover it to keep anything from spilling out!
They are incredibly versatile as well, as you can use them under the sink or in the cabinet under the sink to make everything that was once tossed down there and forgotten with the door shut, into a nice, grouped area.
Bathroom Window Storage
If you have a bathroom window, you have another great chance to utilize space and create more storage. By choosing either acrylic or plexiglass, your shelving won’t block natural sunlight.
You can do bathroom floating acrylic or plexiglass shelving that is light, beautifully translucent and able to match any type of bathroom relatively easily!
A general idea of the types of supplies you’ll need:
- Measuring tape
- Painters tape
- Acrylic shelf, or shelves that fit above your toilet. You can get them cut to perfect size with TAP Plastics too!
- Acrylic square rods—these will become our shelves “brackets.” They aren’t traditional brackets of course but using these make install super easy and can support a shelf exactly like traditional brackets would.
- 9/64 drill bit
- Ruler
- Pencil
- Level
- Sheet metal screws, size 6 x 1 1/4
Using painters’ tape, go ahead and plan the layout of the shelves on the window. For example, painters tape allows you to see the general layout before going ahead and drilling holes and finding out too late that the shelf is crooked, or you don’t like the way everything’s spaced. Or, painter’s tape can be used for staggering widths, like having a larger space between the bottom shelf than the top too—so you can place taller bottles or items on the bottom shelf for just an example.
Drill two holes in your acrylic support brackets. If you are hand-drilling instead of getting them pre-drilled, remember to drill acrylic very slowly! Drill bits heat up and going too fast may melt the acrylic.
Mark where you want your brackets installed on either side of the windowsill. With your ruler and level mark a line. Measure from bottom up using your taped window guide as a reference point. Once you have your level measurement for the first bottom shelf, you can measure up from there.
Mark the opposite side where the other bracket will be installed. Start with your bottom shelf. Make sure to use your level to get the shelf lined up with your previous or first mark for that shelf you did earlier. Go ahead and measure up from there, repeating the process until you have bracket marks for the number of shelves you want.
When finished marking and checking shelf level, begin drilling in your acrylic brackets with screws, then the other side. Repeat for how many shelves you marked.
Then? Just drop on your shelves, to rest right on those brackets and you are ready to use them! You could add a touch of green with some succulents or plants, place soap, cosmetics, towels, face cloths—whatever your heart desires on these beautiful, crystalline-like shelves!
- Whether you have limited bathroom space or lots, remember to go up with storage, not out. Use your wall space to it’s every advantage as vertical space makes things look less cluttered and keeps it away from the floor.
- Using reflective, mirrored materials open a space to look larger and less cluttered.
- Acrylics and plexiglass are clear and easy to match any bathroom
- You can mix and match any accessories or fixtures, fabrics and bathroom items to your bathroom storage when using plexiglass or acrylics.
 Tackle your mornings head-on with these amazing and simple organization tips and ideas. Don’t struggle to find a little one’s favorite toothbrush, your best blush, or where you might have put your hairspray, costing you precious time. Spend the time in your newly organized bathroom without the clutter, enjoying your new, gorgeous storage solutions!