


DIY Jewelry
 The sky is the limit when it comes to building, customizing and creating your own jewelry with imagination. Resin jewelry, pendants and rings with beautiful touches of nature frozen immortal inside, or tiny recreations of far away planets and more can be trapped or created with acrylics and resin.
But how, exactly, is it done? Where do you start? If you’ve ever wondered how to go about making your own jewelry, from resin to acrylic, here are some amazing ideas to get you started! And if you’re already began, or even if you have your very own business, here are some ideas that might inspire you!
 Getting into Resin: Supplies
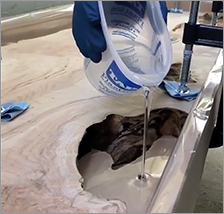
If you’re just starting your resin jewelry journey, one of the first things you may want to invest in is one of our very affordable EasyCast Resin Jewelry Molds with all the various and standard gem shapes you could need as a first timer (or even an experienced resin maker looking to replace old molds).
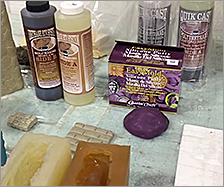
Next, a suggestion on some other supplies to have:
- EasyCast Clear Casting Epoxy
- TAP Clear-Lite Casting Resin
- Craftin’ Craft Mold Release/Conditioner if using EasyCast, makes it easy to release hardened shapes in molds while extending the life of a mold (Saving you money on having to keep repurchasing a mold).
- Wax paper
- Latex gloves
- Medicine cups or plastic shot cups
- A condiment squeeze bottle
- Blow dryer
- Wooden popsicle sticks
- Shoebox or plastic bins to cover molds as they harden and keep dust, dirt, pet hair off them.
- Things to fill in the resin: studs, jewelry, dried flowers, feathers, glitter, and so on!
- Jewelry bases: ring pads, pendant clasps, safety pins, magnets for example.
- E-6000 adhesive/glue
- TAP Plastics multi-measure plastic containers for best liquid mixing and accuracy.
- Wet/Dry sandpaper for any edges. Automotive wet/dry in grits of 600, 800 and 1000 work best.
Once you have these all together, you are ready to begin plotting your new resin jewelry!
Easy DIY Sparkle resin earrings:
Gather your resin supplies as above. You’ll want to add one extra item to these supplies for the earrings: acrylic safe chunky glitter.
How to:
- Pick a shape from your mold. If you need too, prepare the mold for filling.
- Mix your resin according to instructions.
- Once resin is completely mixed, pour them into the mold cavity, but only fill that mold halfway.
- Next, you will sprinkle your favorite, resin safe chunky glitter of choice into your half-filled mold.
- You can use your stir stick, or a popsicle stick to gently push the chunky glitter down into each resin pour. Remember to be careful doing this, as some plastic molds scratch easily.
- Here’s the fun part! You can now do 1 of two things: fill the mold the rest of the way with your clear resin, let cure, or
- Once the half-way filled resin cures, mix a batch of resin with resin safe color pigment to color it.
- Fill the half-filled cured mold with your pigmented resin if going this route
- Let your resin cure. Once cured, flip the mold over and gently twist and push from the back to pop out your resin cast earrings.
- You’ll notice your earring shape may have an edge, and that can easily be gently sanded with fine grit wet/dry sandpaper.
- Add glue on earrings if you don’t want to drill, using E-6000 adhesive, attached your choice of earring pin, hook, or clasp and that’s it!
 Making a matching floating necklace for your newly handmade earrings is super simple! Drill your chunky glitter shapes that are made from the same mold as the earrings from side to side at the top. String them on invisible beading cord as long or as short as you want, making it look like your gems are floating around your neck!
 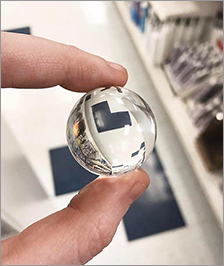 Acrylic Geometric Earrings
The 80’s is quietly coming back in subtle ways. Not the big hair and hot neon jackets, but bold, geometric shapes and designs in jewelry with more chic twists from today, blending the two and coming out with unique and bold statements in accessories. A set of geometric earrings with a touch of color or pattern added could make the final touch to casual style or completing a collection you may be working on.
If you already have acrylics in various shapes and colors or even patterns, a set of these earrings may only take 10 minutes to make!
You could also use your handmade resin jewelry shapes as a base to dangle various colors and shapes from!
Shape suggestions:
- Circles
- Triangles
- Ovals
- Half-circles
- Rectangles
- Oblong
- S-curves or even lightning bolts!
- Your chosen acrylic geometric shape
- Rectangles, triangles, or other smaller shapes or patterns for attachment
- Earring attachments: ball earring posts with loop, French hooks, lever backs, kidney ear wires, ear threads, clip-ons—even magnets!
- Assorted jump rings
- Drill and small drill bits if your acrylic does not have holes in it already
- Jewelry needle nose pliers
When pairing colors, consider the color wheel and what colors complement each other, or go bold and funky and the opposite by using colors that are opposites.
If you don’t have pieces with pre-drilled holes, line up the pieces you would like to attach to your geometric shape. Let’s say, you want to add three long oblong pieces to dangle from it. When you line it up, leave about ¼” space between them and mark a tiny dot above each charm. That’s where you’ll be using a very small drill bit to drill through each hole if your main acrylic shape doesn’t have any.
If you don’t have a hole to attach your earring posts, French hooks or so on, go ahead and drill a hole near the top, across from the three holes you just drilled.
You can use a piece of scrap wood to steady and protect anything beneath the area you are going to drill, and remember to drill slow, as sometimes the heat from the bit can melt acrylics. Once your holes are drilled, use your needle nose pliers to open three large jump rings and connect those charms to your acrylic geometric main shape.
Now, take your earring post, French hook, or whichever you decide to use for placement in the ears, use a small jump ring and a large one to that. Connect the large jump ring to your acrylic geometric shape and that’s it! These earrings with bold shapes and gently jingling charms are ready to be worn!
These are just a few DIY samples of what you can do with resin, molds, and acrylic sheets. Bracelets can be made with laser cutting and a heat gun, or custom cut and shaped right here at TAP Plastics as a bracelet base ready for you to design yourself! Clear acrylic sheets can be cut to shapes, and hand-glued with confetti, vinyl, glitter and more.
Creating your very own fashion accessories or creating one-of-a-kind hand-made custom jewelry not found anywhere else for customers is just a step away and simple with a little imagination and versatile plastic!